I’m now a few months into training with a new coach so thought I’d break down my typical training week to self-assess what I’m doing well, and what could do with improvement. Below is a screenshot (from the free online scheduling/results tracker) of my training … Continue reading Typical Training Week
I started putting this together as a checklist of places and ways to train in triathlon in NYC. This is mostly geared towards people that live in NYC and want to understand their options. I get a lot of questions, from people who just want to do their first sprint tri and then leave it there, to people who are obsessed by it and want to know all the places to do it. The information isn’t exhaustive and where I have no prior dealings with the club I’ve not added any info. If I’ve missed information let me know!
Tri Clubs with lots of facilities
There are a number of triathlon clubs in NYC. It’s not the only way to train so I’ve added in some swim/bike/run-only clubs.
Full Throttle Endurance Training
This is who I primarily train with, and am a part-time coach with them. They are a long established tri team run by Scott Berlinger (ex-gladiator Viper!). They are located in Chelsea Piers at 23rd street by the Hudson River. Their facilities are awesome: 6 lane 25 yard pool that overlooks the Hudson River, an indoor 440m running track (with a 200m inner loop), Computrainers, and a serious wealth of training equipment (it’s USA Weightlifting facility, has a US Masters Swim club, beach volleyball court, basketball courts, climbing wall, etc).
There are a number of coaches and coached sessions:
5 morning sessions per week 5:45-7:45am
2 sets of 3 morning sessions per week (See website for timing)
3 evening sessions per week
Saturday morning swim session
Various Computrainer classes (additional $, but also available for non-club members)
Apart from that there are always people going for long bike rides and runs. Previously I trained a lot more by myself but found my quality of training has improved by being in a good social group.
Asphalt Green are another regular on the NYC triathlon scene and probably the closest rival to Chelsea Piers in terms of facilities. They have the plus of two locations: upper east side and battery park city; lots of group workouts including long bike and runs at the weekend; and a decent cost structure.
Cost: $649 per year (or monthly for gym members) Facilities: Everything except Computrainers and indoor track.
This club is run by Earl Walton and I became aware of it as he is coaching a friend of mine who is a very high level amateur athlete. He runs his facility on 23rd street between 6th and 7th street. The facility is geared towards coached indoor bike sessions although he is a fully-fledged triathlon coach.
They have a number of bike sessions each week and a bike/run workout (with the run portion going outside). Check online for their schedule. Additionally during the summer Earl coaches swim sessions at Palisades Swim Club on 9W. You can bike out there swim, and ride back. Or drive…. 🙂
Additionally Earl coaches a yearly swim camp at St Croix with Olympic gold-medallist Misty Hyman in November culminating with the St Croix open water swim race.
Cost: TODO! Facilities: Primarily Indoor Bike Training
Terrier tri have a decent presence in NYC and do lots of their training outdoors in Central Park. As such the core of their program runs during the triathlon season and not through the harsh winter months. They have indoor swim classes and computrainer sessions indoors however so you can check out their website for details.
I believe they are affiliated with NYC Hydras swim club as you need both a USMS membership and a USAT membership to train with them (for insurance purposes) and you would affiliate yourself with the Hydras in the USMS membership.
Cost: $109/month for group training (also add-on fees for race-specific training) Facilities: Primarily In-season outdoor training with indoor swim and computrainer sessions
TriLife is a relatively large club based in NYC that focuses on specific half ironman or ironman races. My understanding is they coach for specific club races. So in a given year the club race would be Ironman Lake Placid, for example, and from there the training for everyone is geared towards the same race. Most of their training is outdoors on the roads. TODO: Indoor/Swim training?
Cost: I don’t have up-to-date info. I remember their pricing being competitive (in my opinion) compared to other groups. Facilities: Primarily Outdoor Training TODO: Swimming?
Yet another of the larger clubs in NYC, Empire Tri are seen around quite a lot in NYC. Similar to Terrier Tri, Empire Tri do a lot of their training outdoors during the triathlon season with a smaller scale program during the winter.
During the main season group training is focused towards specific club races so that everyone can follow a similar training schedule. Runs and bikes are outdoors in Central Park during the week with longer rides at the weekend. Swims are at Riverbank state park in the upper west side (138th & Hudson River).
Cost: $~400/12 weeks (~$133/month) for group training Facilities: Primarily In-season outdoor training with indoor swim
TriLatino is a smaller club and unsurprisingly by the name is focused towards getting Latinos into the world of multi-sport. I don’t believe that precludes others getting involved with the club though! Again they do bike/run training outdoors primarily in Central Park and then have a couple spots for swim training. They have a mix of packages: marathon, triathlon, triathlon-plus. Unfortunately I couldn’t figure out the difference between the triathlon and triathlon-plus packages but they have a form where you can ask for general information on their website.
Cost: $475/$775 for Triathlon/Triathlon Plus Programs. (Not sure on duration) Facilities: Primarily In-season outdoor training with indoor swim
For a while I lived in Hoboken and worked in NYC so including them in the list. This is by far the cheapest option I’ve come across. The team is run by its members so is not generally led by coaches. They have regular outdoor bike/runs throughout the week and continue as long as their demand into the winter. There is a masters program at Steven’s university in the middle of Hoboken which I think costs ~$50/month.
Cost: ~$25 per year Facilities: Primarily outdoors. Indoor swimming at Stevens, track sessions outdoors at Weehawken.
CRCA is a long-established USA Cycling bike club that runs a series of races in Central Park throughout the bike season. It costs $40/year once you have your USA Cycling membership. Once you have those two things you can race in central park fairly regularly for $5 a pop. They also have some crits and races outside the city (e.g. Bear Mountain Spring Classic). Bike racing is perhaps a little more crash-prone than triathlon so if you’re new to bike racing make sure you do the complimentary skills handling sessions that the club runs throughout the year.
Cost: ~$40/year + $5/race (or $100 for membership and all races) CRCA Website
CRCA
CRCA is a long-established USA Cycling bike club that runs a series of races in Central Park throughout the bike season. It costs $40/year once you have your USA Cycling membership. Once you have those two things you can race in central park fairly regularly for $5 a pop. They also have some crits and races outside the city (e.g. Bear Mountain Spring Classic). Bike racing is perhaps a little more crash-prone than triathlon so if you’re new to bike racing make sure you do the complimentary skills handling sessions that the club runs throughout the year.
Cost: ~$40/year + $5/race (or $100 for membership and all races) CRCA Website
Rapha Cycling Club (RCC)
The Rapha store in the meatpacking district is frequented by many cyclists and is a landing spot for many roadies who land in NYC. They have groups rides on a regular basis that are available to all, as well as a cycling club. If you join the cycling club you can race in the CRCA series as an RCC rider. One of the huge benefits of RCC is that when you travel to other cities they will loan you a bike to ride.
Although not a club as such, the Gran Fondo is probably the biggest cycle event that hits NY each year. Between their bright green jerseys and weekly group rides it’s hard to ignore the group.
NYRR is the group that brought the NYC marathon to the world and a whole bunch of other running events each year. They have regular runs in the park with various paces for all abilities and are definitely the biggest running club in the city. There are many affordable races throughout the year.
As a data nerd I’ve been collecting information about the Ironman Mont Tremblant course where I intended to race and qualify for Kona. Unfortunately a couple days after returning from my inspection of the course I was diagnosed with a stress fracture so won’t be able to participate. Apart from the disappointment in not being able to race, it is also a disappointment not to be able to test out my race strategy and see if all the effort I’ve been through has been useful. Maybe I’ll go back and race another time.
As a NYC-based athlete there’s a bunch of stuff below related to travel that you might not care about. Please do comment with your experiences and feedback!
Logistics
As most people are probably interested in the course, scroll way way down for stuff on logistics.
Swim
So the swim is in Lac Tremblant. The photo below shows you the swim start on the far side (i.e. the beach), and the swim exit on the near side next to the town. If you’re going up to train you can swim for free in the lake by entering here. There is a purpose built hut with Ironman branding where you enter. You’ll have to give your name in order to gain access for free. Of the 4 days I swam here this was only attended once (on the Sunday) the other days there were multiple gates open and we just walked through. In the hut is some Ironman branded stuff and huge posters showing the various courses. Most of the hotels also have race guides printed out and available next to their hiking/biking/activity guides. If you’re not racing the Ironman (and not smart enough to realise how to game the system: *cough* *cough* the participant list is available online) you can pay an entrance fee and swim. Once through the hut there are toilets (with warm water showers!) to the right which are normally unlocked by 7 or 8am.
There is an Ironman branded corral where you can leave your stuff and launch your swim. Once you’re 50 yards out you turn right and you’ll see the buoys.
During non-race weekends the lake is full of boats and there is normally activity from the early morning (e.g. water skiers) and you can’t swim the actual course, but there are marked buoys that take you at least 1.2 miles out allowing you to swim the whole 2.4 uninterrupted. Once I got to 1.2 miles there were still some buoys further in the distance so you could probably go for 3+ mile swim. Here’s a couple swims I did that show the direction you should swim, the basic idea is to just stick to your right on the way out and follow the buoys which are every couple hundred yards and very visible: swim 1 and swim 2. Swim #2 is straighter just because I made a point to concentrate on sighting! There is no chop other than that created by the water skiers or fellow swimmers. In the morning the water is typically more glassy and even in the windier afternoons, the surrounding mountains keep the water pretty calm. The picture below gives you an idea of how calm it is and that the water is pretty clear.
Both the half and full distance races are pretty simple: swim out turn right, turn right again and then swim all the way back. The start of both races are at the tennis club with the swim exit at a different location. It’s a half mile walk from transition to swim start so it’s worth taking some flip flops/sandals for the walk. Mont Tremblant is very clean so you’re unlikely to step on anything sharp but early in the morning it is likely to still be chilly so best not to lose all your body heat through the ground. To get there you just walk to the lake and keep walking with the lake on the right until you get to the swim start.
Being a non-technical course, sighting during the race should be pretty simple and there isn’t any current to speak of and there are buoys on a regular basis. Being mountainous it is also easy to pick a point on the mountains as a reference. If you’ve got people swimming around you, you won’t have to climb high out of the water to see buoys if you’ve pick a point in the distance to use instead. Here’s an example where you can see a mountain in the background in the middle and a ‘valley’ on either side. Once you get to the race site you can see exactly how the buoys are lined up and pick a reference point in the distance. For the return leg you can pick out the reference point once you’ve turned around at the halfway point:
Depending whether you’re doing the half or the full the swim waves vary a lot. Generally there will be more traffic closer to the buoys so if you’re not a confident swimmer then line up on the left hand side and stay wide. The bonus of this course is that you can swim very wide and it won’t cost you much extra time versus a more technical swim course. An unconfirmed source told me that penalties were not being handed out to those swimming on the inside of the buoys AS LONG AS they don’t cut the corners. If you’re getting beat up and see some space on the inside you might want to use that as a way to avoid the crowds, but speak to the race director before the race or raise it as a question at the race briefing.
Water temperature can be found here. For those whose worst nightmare is a non-wetsuit swim, Mont Tremblant is very likely to have wetsuit-legal swims at all times during the year. You should still do some open water swimming without wetsuit though so that you’re comfortable with the idea. As always, all else being equal, a sleeved wetsuit is going to be faster than a sleeveless.
In terms of goggles, I went with tinted and even though they fogged up a lot (my lack of maintenance to blame) I was still able to sight pretty easily using the mountains in the background rather than the buoys to sight. The sun will appear behind the mountains at different times during the year, but it is likely to appear slightly to your left as you are coming towards the end of your swim even if you’re in the first wave and a solid swimmer. For a back of the pack swimmer in a late wave you are likely to have the sun in your eyes for a large chunk of the swim. If it’s a clear day I’d opt for tinted as even before the sun came out visibility wasn’t an issue. If it’s certainly going to be cloudy then clear are your best bet. Being a non-technical course, choice in goggles are unlikely to impact your race.
As an alternative you can also swim at Lac Mercier. Being a smaller body of water it is normally warmer than Lac Tremblant. To gain access you can enter via the pier (see the link before and look in Google Earth Mode). You can see it by standing outside Hotel Mont Tremblant or outside the post office, and there is a small ladder you can use to get into the water. It’s deep enough to dive into too! There can be boats on the lakes and there are no signs up to warn them of swimmers so swim in a safe manner (in a group, bright coloured caps, colourful saftey floats, etc). There is also a beach there but if you are not a resident you have to pay a fee to enter the water via the beach.
The water in both lakes is fairly clear so if you’re looking for feet to follow you should be able to see them ahead of you they are not kicking air bubbles into your field of vision.
Mont Tremblant is aligning itself to be a very triathlon-friendly destination so here’s the link to their training tourism web page again: http://mont-tremblant.ca/en/training-mont-tremblant/. Each day I left my stuff by the water with no-one attending it and there wasn’t even a hint that anyone might steal it, by the way.
Transition 1
When you come out of the water you have a ~400-500 metre journey on foot to get to the transition area. It’s flat the whole way and smoothly paved so you should be fine. Most people opt to bring their wetsuits down towards their waist as they’re running then take it off fully in transition. Here’s a *rough* google map as to the transition run. Transition 1 masquerades as a parking lot on non-race weekends.
Bike
The bike leg is the same across 70.3 and full distances except in the latter you do the loop twice. You’ll exit T1 (the parking lot) and there will be a penalty tent directly on your left as you leave. As in all triathlon races, make sure the first thing you do is stick your helmet on your head when you get to T1 so that you don’t take the bike off the rack before your head is protected. Otherwise you will have to serve a stop and go penalty early on in the bike leg!
So the bike loop. It’s 3000 ft per lap. No, it’s 3300 ft per lap. No it’s 3800ft per lap. I rode the course twice with two setups (more to follow) and without Garmin’s elevation correction they came out as 3000ft and 3300ft. With it turned on they both came out at 3800ft. If it’s 3800ft then it’s a pretty easy 3800ft.
In both rides I was wearing the same kit (I washed it the night before). From the video below you can see it blowing around a little bit so in my tri kit I would probably have saved a watt or two. Apart from that everything was pretty much optimized.
Same across rides:
– Average power was 220w on both days (with NP of 224w on Day 1 and 222w on Day 2).
– My Full Throttle Endurance Racing Bike Kit. It’s not a TT-specific kit so it rippled in the wind a little. (Yes, I did was it between days)
– ‘Hairy’ legs both days.
– XLab Stealth Pocket 300 on the top tube containing a multi-tool, 2 CO2 cartrdiges + adapter, 2 plastic tire levers
– Riding the Cobb test saddle (again courtesy of Fitwerx!). The reason I mention it is to explain the random green that screws up the colour scheme 😉
– Spare tired jammed underneath the seat and taped lightly to try and make it more aerodynamic
– Tire pressure pumped up to 105 PSI immediately before the test.
– Barometric air pressure virtually the same in both days (1012-1016mb)
– Road traffic levels the same
– Was using a borrowed Garmin Edge 800 from The Domestique. The theory from Joe at Fitwerx was that I would have a much flatter power profile when the numbers are constantly in my face! He was right, as usual.
Differences:
– On each day when stopping mid-test (e.g. to get water or take a picture at the turnaround) I would stop the recording as close to my stop as possible and stop before I start breaking. This will introduce some minor noise but this should be minimal across the two rides.
– On Ride 1 I only drank 2 bottles and on Ride 2 I drank 5, so I guess Ride 2 had a slight weight penalty.
– The historical weather for Mont Tremblant can be found here. Ride 2 was done in warmer and windier conditions. From what I can tell the wind statistic on Ride 2 was understated as there really was a stiff continuous headwind heading to Labelle. Speaking to a local rider in Mont Tremblant he said it was the windiest day he ever remembers (it still wasn’t that bad, compared to the winds of Kona!).
The results. Despite being a much windier day for ride 2 I maintained the same average speed which I can only attribute to the disc wheel having much better aerodynamics. Hopefully I’ll be able to go back at some point and retest in race conditions. It, like all North American Ironman courses definitely favours a disc wheel.
In terms of gearing I found the 53/39 11-28 set up to be pretty close to optimal. When using it I was able to spin up the bigger hills at a cadence of 80rpm+. On the steeper hills on the tail end of the course (maybe 5-6 in total) I still got out of the saddle but the easier gearing option allowed to go up them really steadily. On the other end of the gearing spectrum I think a 53×11 is mandatory if you want to be able to maintain your power targets on the downhill or with tailwinds. More details below on the various sections of the course.
High Level Power Numbers
So before we get talking about numbers, a few caveats, both rides had water breaks, photo breaks, etc. These were done at points in the course where there are turns so shouldn’t impact the numbers.
Ride 1:
Ride 2:
Ride 1 has a higher average heart rate, higher heart rate spikes, higher max power, higher normalised power, etc. Ride 2 had lower ‘effort’ metrics across the board although had a higher max speed. Looking at the power files in Golden Cheetah I can see that this highest speed came late in the loop on the downhills and having ridden it the previous day I knew I could power down even the steepest sections. (More on that section below).
Additionally, I think the change in gearing are the main causes why the lower max efforts exist in ride 2. Being able to switch into 39×28 (versus) 39×25 meant I could go slower while keeping my cadence up. My general riding style is to maintain cadence so if I get to a steep roller I prefer to go a bit harder, maintaining cadence above 80 if possible, rather than drop cadence and go slower. Once my cadence drops below 75rpm I find my muscles are taxed a lot so even though the effort exhibits a lower cardiovascular impact, it has a large impact on my muscular endurance.
Description of sections of the course
For the purposes below I’ll refer to power as watts per kilo. Right at the bottom of the cycle section I’ll add some notes for those without power. For those who are concerned on gear ratios check out this calculator. Enter in the details of your cassette setup and then you can see a matrix showing speed depending on what gear you’re in and your cadence.
Riding Montee Ryan
Coming out of transition you could be forgiven for thinking that you’re about to enjoy one long fast downhill section given you’re coming out of a ski resort but that’s not the case. In the first 7 miles you finish about 150ft lower than where you started filled with gentle rollers and one short very fast downhill across the bridge as you cross the river. It has a couple bumps but nothing that you need to come out of the aerobars for it you’re a confident rider. If you click on the photo below (from Google Maps StreetView) it’ll take you to the interactive maps. The line across the road is the bump I’m referring to. In this section I to spin up to ~110rpm on the 53×11 to maintain my power target.
Once you get to the junction at the bottom (you’ll see McDonalds on the right) you turn right onto 117.
The steep hill on 117 – Going out
After a short stint on 117 you’ll come to a hill. Going out it’s less steep thankfully. On the subsequent downhill, things get very very fast. You’ll need a 53×11 and the ability to pedal quickly to maintain power targets. I’m only 134lbs and get blown around quite easily and you’ll need to stay calm and focused if you want to keep your power targets on the way down, remembering Einstein’s quote: “Life is like riding a bicycle. To keep your balance, you must keep moving.”. You’ll be much more stable if you keep force in the pedal rather than coasting and allowing the wind to dictate your movement. Will cover this in more detail on the way back.
The ‘flats’ of 117
Once you crush the downhill you have about 20 miles of pretty much flat riding. This is unquestionable the fastest section of the course. There are a some false flats and gentle rollers but you can just get in the zone here. You’ll want a disc for this section without doubt and any improvements you make to your aero position will payoff. Here my averages speeds were 24.4 and 24.8 mph @ 220 watts for ride 1 and 2 respectively.
Make sure you pick water/nutrition at the aid station at the turnaround so that you can hydrate on the way back before tackling the climb on the way back towards the resort.
The ‘Make-up’ loop on 117
Before you get to go to Montee Ryan you have to do an extra little loop to make up the distance. Although the majority of riding on this course is pretty open and you can get into the zone, this short section of the course requires lots of turns. Hopefully the previous sections of the course will have broken up the field so that you’re not dodging people at this section.
You’ll exit 117 and take the exit road down past a gas station on the right. A litte further on the road diverges, take the right. You can power along through this section, just remember to keep right.
Don’t keep your head down too much because you’ll come across another intersection where you need to turn left. You turn left before the Ford dealership. Again you can power through this section but it’s a slight downhill so you’ll need to switch onto the brakes pretty quickly.
The following sections are only a few hundreds yard each so if you want to make a series of passes this might be a good section if you’re willing to potentially burn a couple matches powering out of the corners. It’s not long before you’re back on the open highway and can make passes there too. So after turning left at the dealership you:
– Go under a tunnel and go straight until you hit the end of the road
– You turn right onto Rue de San Jovite into town where I would expect there to be lots of people
– After a minute of being on that road you’ll have to make a U-turn
– After the U-turn you continue straight until you’re back to the highway
– You’ll have to make a slight left turn to the highway
If you’re training I’d advise taking this section easy as there is lots of traffic and they won’t appreciate people with funny bike helmets flying around and making unpredictable turns.
Coming back on Montee Ryan
So now you finish the flats you’ll be confronted with a long looking climb. In both rides I went up at 230 watts although on the 39×25 my cadence dropped to 80rpm, whereas in ride 2 it stayed above 95rpm the whole time. The speed across both rides were pretty close (within 0.2mph). I was glad to have the 28!
The climb is ~1.3 miles with ~ 350 feet of elevation gain. That works out to an average grade of about 5%, that doesn’t sound to scary right?! The gradient (a.k.a. the steepness) of the climb is pretty consistent overall although the first half is ever so slightly steeper (~6% and then it flattens out a bit later to about 4%). I didn’t notice that while on the climb though. When targetting your gearing choice this is the hill you should think about, if you don’t have enough gears you’re going to be hammering your way up the hill, or worse, walking!
As a reference point for those with power I was at ~ 4w/kg in the 39×28 spinning at 90rpm+ at about 10-11mph. The domestique challenged me to stay aero the whole way up but it was not comfortable!
The ‘hilly’ loop
So once back at the ski resort you’ll blaze straight past with the route on your left and continue straight out. On this section there are some short sharp punchy hills, each one probably less than 100 metres in length. In the 39×25 my cadence dropped to 70-80 each time requiring me to get out of the saddle and go way above my target watts. The extra gears on the 28 were useful because on ride 2 the spikes were much easier. These hills whilst short can really sap your legs so the first time up you need to really hold back on the first lap if you’re doing the full distance. Once you hit the turnaround it’s pretty much all downhill from there. It winds but you can literally put on the gas the whole way back to the end of the lap without braking. You’ll want good handling skills to take full advantage of this and if you hit traffic it’ll turn a fast section into a potentially dangerous and frustrating section.
Modelling your time
If you haven’t heard of BestBikeSplit.Com you can use it to model your finishing time for courses based on power. I managed to recreate my time pretty close to the real time including average and normalised power. My actual race target watts was to be 210 rather than 220, but I figure I’ll be somewhere around the 5 hour mark. To calibrate the model you’ll need to give it good information about size/weight/bike/etc.
Another benefit is that you can put in limits to how hard you want to push (in terms of power) when going uphill. This is really great for training if you have the patience to do it indoors on a Computrainer.
How do I choose my cassette?
So if you have a powermeter, find a climb where you’re going about 4watts/kilo @ ~10-11mph. At that point you will know you are on a climb that is similar to the one I refer to above on 117. At that point just go up and down the hill trying out different gears until you find one where you can find a comfortable cadence. If you have access to multiple cassettes, it’s worth putting on the most conservative cassette you have and once you’ve found a ‘nice’ gear take note and that will be the biggest gear you’ll need at back.
If you don’t have a powermeter and you can find a hill that’s a mile long and a pretty steady 5% then use that instead. Go up at your target effort level for the race and play around with your gearing until you figure out whether you’ll need more options for the race. Remember that if you are going to race by heart rate you will need to start the climb already at the target heart rate so you don’t get noise from changing heart rate levels.
I prefer the former method because you can just show current speed and w/kg on your computer and give it a quick look while on your normal training rides and it doesn’t cost much time. So if you run out of gears you can go to your local bike shop and tell them you’re running out of gears on the hills and need more. They should know what you mean. Your options are to change the cassette out back to make the range wider (e.g. from 11-28 to 11-32), or change the chainrings up front to make the numbers smaller (e.g. from 53/39 to 50/34). I’d advise you go in with actual numbers like “I was on a hill and I was in my easiest gear and my cadence drops to 60rpm, and I want it to be 80rpm”. If they’re knowledgeable they can use the gearing calculator to make an educated guess.
One note on gearing, the number of gears won’t change despite the cassette you put on the back. E.g. a 11 speed 11-25 will have lots of options between the smallest cog (11 teeth) and the largest cog (25 teeth). If you switch to an 11 speed 11-32 you have the same number of gears but there are larger ‘steps’ in the intermediate gears. So if you choose to change gearing make sure you do it a few weeks ahead of the race to see if you miss the intermediate gears.
Transition 2
Not much to say about this. Just remember to rack your bike before you take off your helmet 🙂
Run
So you finish the bike and you’re feeling awesome. Now time to crack the run. The overall run was much easier than I was expecting. It’s easy saying that knowing I’m not going to be racing but I was pleasantly surprised when I was training on the course. Having used Central Park in NYC as the training ground (it is also undulating with a a short sharp hill) the course at MT is definitely easier.
Here’s a run that includes the full loop plus another out and back on the rollers.
The Initial Half Mile
When you come out of transition you have just under a half mile before you hit a steep short hill. The race program shows this as a wall that you’ll have to climb over to get running again. The Garmin elevation profile shows it to be much more sane. I’ll leave it up to you to decide, but in truth it’s somewhere in between. It’s a steep hill of 8% but only lasts a couple hundred metres.
If you’re careful to maintain your cadence and take small steps you can control your heart rate to a decent extent. If you’re not a svelt ‘runner’ you might want to powerwalk up this section. It’s very early in the run to let your heart rate spike a lot. As soon as you get to the top you have an equally sharp downhill leading down to a roundabout. I’m a fan of trail running and practise running fast downhill fairly regularly. It requires loose muscles and fast turnover of your legs to go down at full speed. If your legs are jelly after the bike then best to go slow down this section.
The Rollers
From this point on you have approximately 2.5 miles of rollers. If you were able to run down the first hill you’ll probably enjoy this section as there are some inclines where you’ll want to slow your pace in order to not redline, but with every incline you get a decline on the opposite side. If you’re able to loosen up and use gravity in your favour on the downhills you’ll make time on those who don’t have experience on downhills. I’m not trying to portray them as steep downhills but experience mediating your effort on undulating run terrain will pay dividends here.
Your elevation at the start of the rollers is exactly the same as the end (i.e. when you get to Hotel Mont Tremblant).
I ran the rollers a total of 6 times across 2 runs. The long run goes over the rollers 4 times and this one goes over them another 2 times (This run is the rollers only). There’s a few places where my pace drops to 9 min/miles on the uphills and then jumps to low 6 min/miles on the downills, whilst my effort remains more or less consistent.
An example incline:
An example decline (even though you can’t really tell):
The Gradual Decline (Petit du Nord Part 1)
So you’ll pass Hotel Mont Tremblant on your right and you enter Le Petit Train du Nord. (See the first run although I think the elevation for laps 5-8 got screwed up). Going out you’re on a net downhill. After running it I broke it up into 3 subsections. The first km or so was so flat I didn’t notice any elevation change at all. Then in the middle there’s a more perceivable downhill and then the last section feels completely flat again. Certainly nothing to be scared about and you can even pace this section.
This section is perfectly paved and functions as a bike path on non-race days. You can only fit 2 runners side by side on each side so if you’re looking to set the race on fire you’re going to have to be careful of other traffic as you try to maneuver your way through the field.
The Return (Petit du Nord Part 2)
Eventually you’ll get to the end of the run and do the reverse as above. After comparing heart rates and pacing on the up and down I figure that it’s probably worth having slightly different pacing strategies going out than back. If you’re someone that enjoys flat pacing for long periods of time then you shouldn’t be scared to run the same pace up as back. The difference in heart rate for the same pace for me was about 4bpm higher going back than going out. It’s unlikely to blow up your race if you do that. However for me, I like small targets so my race strategy was to run 4:20-4:25 mins/km on the way out and mentally mix it up by running 4:35-4:40 on the way back for an even-effort strategy.
A shot of the path:
The Gravel Section (Petit du Nord Part 3)
Once you’re back towards Hotel Mont Tremblant you do another quick out and back, this time on a gravel section. From reading other race guides I had thought this section was very long and had about 20% of weekly mileage running on gravel or trails. This section is very short, flat and very tightly packed. It won’t impact your pacing at all. The total is probably less than a km on this section.
To see it click here and the turn the view so the lake is on the left. You’ll see a gated off section on the left. That’s where you’ll be running.
The view of the gravel (going out). It’s flat even though the picture may not look it.
Returning on the Rollers
Returning on the rollers is pretty much the same as going out. Again, your net elevation gain is 0 from Hotel Mont Tremblant back to the town. If you’re doing the full and have a conservative run pace for the first ~22 miles this will be your opportunity to crush those that are strugging. For that reason in my last training run I decided to run that section faster than target pace – to build up the mental imagery ahead of time. This might have been what tipped me over the edge in terms of stress fracture I guess?!
The rolling section of the course you can walk virtually using Google Street View. Click the image below to take you to the start of the rollers (Lac Tremblant is on your right and you walk it all the way to Hotel Mont Tremblant. There is no streetview for the bike path:
Coming Towards Transition
As you come into town you’ll see the transition area 100 metres or so to your right as you’re running with the lake on your left. You have to do an extra little loop but it’s very short, although has a little bumpy incline you have to get over. It’s not like the ‘big hill’ that you would have gone over 4 times before you reach it, but if you’re neck and neck with your competitor and trying to shake them off this will be your last ditch attempt if you don’t want a sprint line finish for the cameras 🙂
NOTE: This section isn’t in the practise runs as the Blues festival was on and I didn’t fancy running into crowds of people!
“Other”
Suncream. I’m pretty fair skinned (see the photo below). I was out 3-4 hours a day while there in the midday sun and didn’t get sunburnt at all (70-80s fahrenheit). You could probably chance it, but you’re unlikely to burn as much as hotter races (e.g. Eagleman).
Altitude. The official altitude of the resort (i.e. where transition will be) is 270 metres or 880 feet. You shouldn’t need to be worried about altitude acclimatization at all. We arrived at midnight and the next morning were training and didn’t feel a thing.
In June 2017 the cost of a swim there was $9CAD. There is also a gym there which is extremely geared towards triathlon. They have treadmills, two rows of spin bikes, 3 bike trainers (if you want to take your bike), TRX bands, a Vaso rower and a stable of stability tools and a few light weights. It is new as of a couple years ago and I was told that Ironman donated a large amount of money towards it. If you want to use the pool and do a bike trainer session (e.g. ride a specific course on your own bike) the cost was $19CAD. Very reasonable coming from NYC!
The swimming pool is a 25m competition pool with 8 lanes, starter blocks and a diving board. While I was there they had closed 4 of the lanes for a children’s party (they had a giant inflatable obstacle course). The busiest lane had 4 people and a large amount of the time I was only sharing with 1 other person. This is 3 days before Mont Tremblant 70.3 so I’m guessing it’s not crazy busy.
Logistics
Driving from NYC. The drive from NYC to Mont Tremblant is listed as ~ 7 hours according to Google Maps. It is perhaps the simplest drive possible considering the distance. Get out of NYC outside of rush hour (we left midtown at ~3pm on a Wednesday) and were out onto the Taconic Parkway pretty quickly. From there it’s I-87 all the way to the border and then from there there is a highway from Montreal to Mont Tremblant. Look at Google Maps for directions. Other things to consider:
You may get slowed down at Albany if you hit their rush hour
There are quite a lot of state troopers around Albany (I was lucky enough to meet one as I got a speeding ticket)
The state trooper said that they are mostly looking out for people going above 80mph. The speed limit is 65mph.
Gas was cheap (<$3 gallon everwhere). I think the total gas cost was <$120 there and back!
Border control is painless if outside of busy times (e.g. weekends). Each way we talked for about 1 minute with the border control.
You have to pass through Montreal. If you don’t plan stopping then try and pass through late evening or during a quiet period. There aren’t any alternative routes so if you get stuck in traffic it’ll suck.
There aren’t many good eating options on the road. We settled for Subway…
Eating in Mont Tremblant
Mont Tremblant is split up into the resort (next to transition) and the town (~10km from the resort). We stayed in the resort so these comments pertain to that. While we were there it was very busy due to the blues festival. Despite that we found a couple places where we could eat quite reliably:
La Diable: Microbrewery and restaurant. We went there most evenings because they have lots of tables and even if the tables are busy, the inside section was pretty quiet. Food was good and reasonably priced.
Brulerie St-Denis: This place is open early enough in the morning so we grabbed breakfast/coffee here alot. It is expensive but the food is okay.
Maison de la crepe. We tried to go here a couple times but they don’t have many seats so there was already a 20 minute wait every time we went and we’re impatient guys.
Further up the hill there are a bunch of restaurants but we were as impatient as we were lazy and rarely went up there. Please let me know if you have any good recommendations, especially for race week!
In the early morning, before 10am there really weren’t many places open for breakfast. I would imagine for Ironman week they will open earlier as there are plenty of restaurants, but try and figure this out early.
Groceries: There is a magazin (grocery shop) near la Diable. They have a good range of fresh food if you’re looking for stuff like eggs/mile/ice cream/etc. It’s understandably a little expensive so if you’re driving into Mont Tremblant you may want to stop off at a chain supermarket to supply yourself with the bulk of stuff you need.
Bike Stuff: If you need bike stuff and in the resort there is a place called Boutique Explore which is more of a general purpose store for activewear. At the back they have a section selling bike/tri kit and a few essentials (Rudy bike helmets, a narrow range of energy bars, etc). Don’t expect to get what you need from here. There is a shop called CyberCycle near Hotel Mont Tremblant (on the run course ~5km from the resort) which has a wider selection and is a bike specific shop. There is a cafe in the same place with seats too. I found Cybercycle stuff to be a bit costly (XLabs computer mount was $79CAD vs $49USD). That’s an N=1 experience, given they’re a fairly small business and the only game in town you might find yourself in there when you need something. One thing to say is to make sure you get all your mechanical stuff done ahead of time (2 weeks ahead of time!) as you don’t want to panic if this is the only place that can fix your stuff.
Accommodations Many of the places you can stay in the resort are all afilliated with the resort. So if you’re trying to get a place there go to the official website which has them covered. This includes the chains such as the Westin/Holiday Inn/etc. A local lady who worked on the tourist board told us this was the best place to go for deals. We stayed at the Chalameau and it was awesome. We had a 2 room apartment with everything we needed (TV, sofa, kitchen, outdoor table, etc). I’ve also stayed at the Marriott and in L’Equinoxe which were both great. L’Equinoxe is a bit of a hike up the hill though!
Outside of the resort there are plenty of options that are cost effective (e.g. Auburge Savingnon, Hotel Mont Tremblant, etc). Pretty much all of the places are well-aware of the cash cow that is Ironman so book as early as possible if you want to get good prices. Places will book up quickly!
5150/70.3. In June you’ll have the 5150 race the day before the 70.3. This doesn’t really impact the flow of things, but just be aware if you’re doing the 70.3 and are driving into the MT resort on the Saturday, you’ll probably have issues accessing the car park until 10am-ish as there will be riders on the Olympic bike course.
Conclusion
Awesome course. You’re going to love it. This was at the end of the training run when the Domestique and I were saying in our French accents ‘It is how you say, uh, no big deal’. I can’t wait to go back and race it!
So, when we get into the habit of putting our stuff into TP we can get some good stats. Ignore the distance column because it will miss stuff like Computrainer sessions, but from the screenshot below we can ascertain:
Number of hours training from March through May are very consistent
From March -> May, top level intensity was gradually reduced (i.e. we’re becoming more race specific)
Despite top-level intensity decreasing from March->May, TSS went up substantially in May.
The reason for this is that there are less-intervals and more steady state training (i.e. 2x20min@85% has more TSS than 5x3min @ 120% as the latter has lots of recovery spinning in the session).
During June you can see top intensity dropping a lot (week 1: 5min heart rate max = 172, week2: 166, week3 (so far): 159.)
Week of 8th June looks like it’s missing some data so June is likely to be incorrect with respect to monthly TSS numbers
The reason for this gradual change is that I am gradually getting ready for Ironman Mont Tremblant. March and April were characterised with some more intense races (e.g. CRCA bike races, 10ks and half-marathons) and then in May I started doing longer distance races and took out a little intensity of my speed sessions to make sure I’m not overloaded.
Unfortunately today I have a quad strain and depending on how that goes Junes numbers may look less consistent due to missing data and the rest of this weeks training perhaps not happening. Will be back on track for July!
From looking at the footage again more closely, I think you may be overstriding a little bit. Don’t worry, increasing cadence and adopting the forward lean is likely to fix those.
Cadence: ~85-88 on average from what I recorded. If you get a footpod record the cadence on a long run and that way we get some real number. Goal: 95, without losing distance per stride. You’ll see some articles quote 180 which counts both feet so that’s 90 per foot. That number comes from a study from a long time ago and is often misquoted as the truth is that elite runners all run at 90 OR ABOVE. I think your running will have more flow if you bring it up to 95.
One long run. This will be long and slow. At first it will be frustratingly slow! Keep tracking your cadence throughout and see if you can hold the same cadence the whole time. On the first long run with the footpod, don’t adjust anything, just record the data with your normal running style. Take a look at average cadence, as well as cadence in the first few miles versus the last few miles. In subsequent long runs: a) try to keep your cadence consistent throughout. b) gradually try to bring up the average.
One track/intervals session. E.g. the GC track session. Ideally not on the treadmill as it can affect your running form. Record your cadence. You will probably find that on 400/800m intervals your cadence will be higher naturally. If it is higher than normal (e.g. 95+) then the intervals might really help bring your cadence up. These are good drills to do before this session (and before all of them if you have time): https://www.youtube.com/watch?v=2GLrKr54yA0.
One tempo run. E.g. a 4-6 mile run at the pace you were running at the track.
Here’s a drill for the forward lean if the approach I showed you at the track doesn’t seem to help: https://www.youtube.com/watch?v=9R-3UT1Vd9o. I’m not actually a fan of the second drill in that video however.
So, Cedar Point is ~3 months away. I’d suggest this:
Work on cadence improvements for 4 weeks.
If it starts to feel natural and you’re seeing speed improvements then stick with it for another 4 weeks.
If nothing changes to your speed AT ALL, then switch to the forward lean for 4 weeks.
The last 4 weeks, just focus on preparations for Cedar Point.
TESTS:
So, in order to see if we’re making progress we have a couple of options:
Run a 5k/10k each month (in place of the tempo run) and record the time. This is a max effort. It takes a while to see a trend (multiple months) as each individual test may be impacted by other factors such as a bad night’s sleep, or fatigue from previous training sessions. These kinds of tests are normally a good indicator of race performance.
On the track, or in some repeatable scenario (e.g. treadmill) run at a specified heart rate for ~10 minutes or so after warming up. Get the average speed for the last 5 minutes. This is a more of a passive test as you can do it every week as part of one of your runs. You get more data points than the test above although it’s not really going to tell you how well you’re going to do in your next race. So, how do you pick the specified heart rate? You can look at your average heart rate for a race that relates to a half ironman, e.g. a half marathon, or the run leg of a previous 70.3.
It’s worth while capturing both numbers if you can. You may find that you progress in one more than the other.
This is where your muscles start to become actively engaged (you can see the difference that your calf and quad muscles compared to the previous photo). It looks like you may be overstriding a little bit as your foot is slightly ahead of the center of your hips and your shoulders. Increasing the cadence and adopting more of a forward lean is likely to help. I think this will result in less wasted energy on each footstep.
Here’s some other points:
It’s not really visible in these specific shots, but you can see that when you run you push off, your leg is fully extended behind you and then as you pull it through your foot comes up quite high during the recovery. If you watch some videos of elite runners you’ll see that when their foot is recovering (i.e. coming forward) it comes very close to their bum. It’s supposed to be more efficient. You appear to have it naturally and it is likely to get more pronounced with speedwork.
Your arms actually look more relaxed here than when I saw in person. As long as your shoulders feel relaxed try to go with it. Let’s see how the 2 changes work out and not worry about this for now. You have a natural bend at your elbow (~ 90 degrees) which looks great.
Your head if looking forward, not looking to the ground which is great too.
I raced this on the end of a heavy training week. I completed in about 1hr22 minutes. Central Park is an undulating course and towards the end of the race I decided I wasn’t going to kick towards the end. Not sure what I could have done fresh and kicked towards the end, maybe 1hr20 or 1hr21. Guess I’ll never know, but I can do some halfs towards the end of the season.
Bear Mountain Spring Classic
This was a ~42 mile race in Harriman State Park as part of the CRCA road race series. I’m a CAT-5 as I’ve only just started road races this year. During the race I had issues on the steeper ascents, my back started spasming. I wasn’t sure what to do because I hadn’t had this issue before. I ended up getting dropped from the lead group and then as I hit the flats my back sorted it self out so I would start working again to get back up. Each lap the same thing happened with spasms so ended up coming across the line just after the chase group. Was lots of fun though.
American Zofingen
I did the long course duathlon. I knew it was going to be a 7-9hour day despite not having to swim and the bike/run distances being shorter than an IM. I was experimenting with just fueling with UCAN. For breakfast I ate two bars totaling ~ 400 calories. The opening run I did in ~45 minutes with no calories, then on the bike I consumed 7 servings of UCAN, more than recommended but I’m still getting confidence in the fueling strategy. Towards the end of the ride I started struggling a bit and talked myself into changing my target watts to a more conservative strategy. I was running a 53/39, 11×25 gearing setup which wasn’t enough, I had to go away above FTP numerous times to climb up the hills. I think that took it’s toll so the last ~45 minutes of the bike I was in survival mode. Once on the run I felt okay again although it was very humid by that point. I drank way too much heed and after the 3 laps of running I vomited a lot of it again! Overall it was a good day for learning. There weren’t many competitors in that race but I was happy to win my age group nonetheless.
Black Bear Olympic
My goal in this race was to swim as hard as possible. I failed in that regard. I think I was just mentally lazy as I wasn’t too fatigued at the end of the swim. The bike I went reasonably hard and the run was very difficult: lots of hills and lots of trail running. I made a few mistakes: on the bike I dropped my sunglasses costing me a minute or so, I debated whether to leave them but felt bad that it would have been considered littering. Then leaving transition I ran out and forgot my number and decided to go back for it. That probably added up to an extra 500-800 meters of running. Towards the end of the run I was passed by some guy who was working hard, but I didn’t fancy running myself into the ground as I was doing Quassy the week after. I came second in my age group, second by 9 seconds. Whoops. Fewer mistakes would have led to a better finishing position. Never mind.
Quassy Aquabike
Despite planning to do the half iron tri, I dropped down to Aquabike. Walking down the stairs after the black bear triathlon, something went in my foot. I couldn’t run for a few days, or crouch down. Two days before the race I was running again but knowing the course was very challenging I didn’t fancy my chances of bombing down the hills without hurting my foot again. The swim I was a little disappointed with. I was hoping to go sub-30 to give me a chance of going sub-hour at IMMT, but that didn’t come about. The bike course was challenging and my main goal was to keep my cadence above 90 rpm on the uphills, that meant working very hard at times but I didn’t feel like I was going to blow up. Towards the end of the course I think I was losing my ability to generate the same power going up the hills but I stuck in there. The lesson I need to learn is to keep pushing myself towards the end of the bike leg knowing that my legs will still feel good when I get off.
Lessons Learned
My body seems to cope fine with lower calorie fueling options. The big training sessions before IMMT will reveal whether I’m still okay at longer distances.
I can still run off the bike pretty well even when I ride hard.
I need to translate my speed improvements from the pool into the open water! Time to head to the beach I think!
This is a good example where taper plans can change depending on current circumstances and why taper plans can vary wildly between people.
After speaking to SY he has a slight niggle in his shoulder. The niggle came about in a non-training environment (putting on his shirt!) but it could still be linked to his training (e.g. his muscles were tired and sore from training). As such he’ll be resting today, and spending the time stretching out his shoulder and buying flowers for his wife to show how much he appreciates her support.
Additionally, he is in a great position to have his swim teacher, Paul Hunt, take him out for some open water swim practise this weekend. As such we’re reducing the bike/run sessions at the weekend to accommodate it.
At this point his legs are sore from all the training so the bike/run sessions are there to help loosen up this week, and then give them a quick reminder at the weekend of what they’re in for at Mont Tremblant.
Go get em!
Week of
Mon
Tues
Wednes
Thurs
Fri
Sat
Sun
06/08/2015
REST
Swim/Bike (5×200 yards with 1 minute break. NO BREAKS ON EVERY LAP! 30minute easy spin). PRACTISE TRANSITION.
OPTIONAL: Swim. NO LAP BREAKS!
Swim/Run (drills, 4×200 yards. Easy run for 10 minutes)
Rest
OWS with Paul. 60 minute bike ride (15min warm/up, 45 minutes at race intensity). Optional 15 min run. PRACTISE TRANSITIONS!
OWS with Paul. 1hour run (15min easy warm/up. 15min at race intensity)
06/15/2015
REST
Bike/Run (10min warm/up on bike. 20min at race intensity. 10 minute run at race intensity). PRACTISE TRANSITION
Rest/Pack Bike/Prep bags
Swim/Run (drills, 4×200 yards. Easy run for 10 minutes)
Rest/TRAVEL
15min swim. Finish with 3-5min hard swimming focusing on form. Test bike ~ 10 minute bike ride. Run for ~ 10 minutes. Try to start the session at ~ same time as the race
EAGLEMAN
Race intensity = Zone 2!!!!
================= PLAN BEFORE SPEAKING =====================================
Haven’t had a chance to catch up 1-on-1 with SY yet, but here’s the taper plan I’m going to propose depending on how he’s feeling, if there are any injury niggles, whether there are any travel constraints, etc.
The goal of the taper period if to maintain frequency in the swim where SY is still consolidating gains from previous weeks/months of training. As his technique is still evolving I want him to do lots of short swims in the lead up to the race so that the technique still feels familiar once he gets into the water at MT70.3. For a more experienced swimmer I would change it up slightly.
He did well at Black bear Olypmic triathlon finishing the 1500m in 42minutes. At that same pace he would finish the 70.3 swim in the low 50s. Given his concern is the cutoff, he has plenty of room to play with: ~15 minutes. Additionally he won’t be leaving in the last swim wave so in likelyhood he can go 50% slower than at Black Bear and still make the cutoff. From there it should be be relatively straightforward for him to finish.
Week of
Mon
Tues
Wednes
Thurs
Fri
Sat
Sun
06/08/2015
Swim. NO LAP BREAKS!
Swim/Bike (5×200 yards with 1 minute break. NO BREAKS ON EVERY LAP! 30minute easy spin). PRACTISE TRANSITION.
OPTIONAL: Swim. NO LAP BREAKS!
Swim/Run (drills, 4×200 yards. Easy run for 10 minutes)
Rest
45minute swim (5min warm/up. 10min drills/30m continuous swim). 90 minute bike ride (15min warm/up, 75 minutes at race intensity). Optional 15 min run. PRACTISE TRANSITIONS!
1hour run (15min easy warm/up. 30min at race intensity. 15 min easy run)
06/15/2015
Swim/Bike (5×200 yards with 1 minute break. NO BREAKS ON EVERY LAP! 30minute easy spin). PRACTISE TRANSITION
Bike/Run (10min warm/up on bike. 20min at race intensity. 10 minute run at race intensity). PRACTISE TRANSITION
Rest/Pack Bike/Prep bags
Swim/Run (drills, 4×200 yards. Easy run for 10 minutes)
Rest/TRAVEL
15min swim. Finish with 3-5min hard swimming focusing on form. Test bike ~ 10 minute bike ride. Run for ~ 10 minutes. Try to start the session at ~ same time as the race
Whenever people come to NYC they ask me where to go riding. My default answer is: go ride 9W. All other routes require a bit of faff (cycling to Brooklyn requires getting over bridges and invariably some highly trafficked roads, cycling north-east out of the city requires a number of trafficked roads and turns. 9W is probably most people’s default answer as it is always busy when the sun is shining.
Here’s a few pointers.
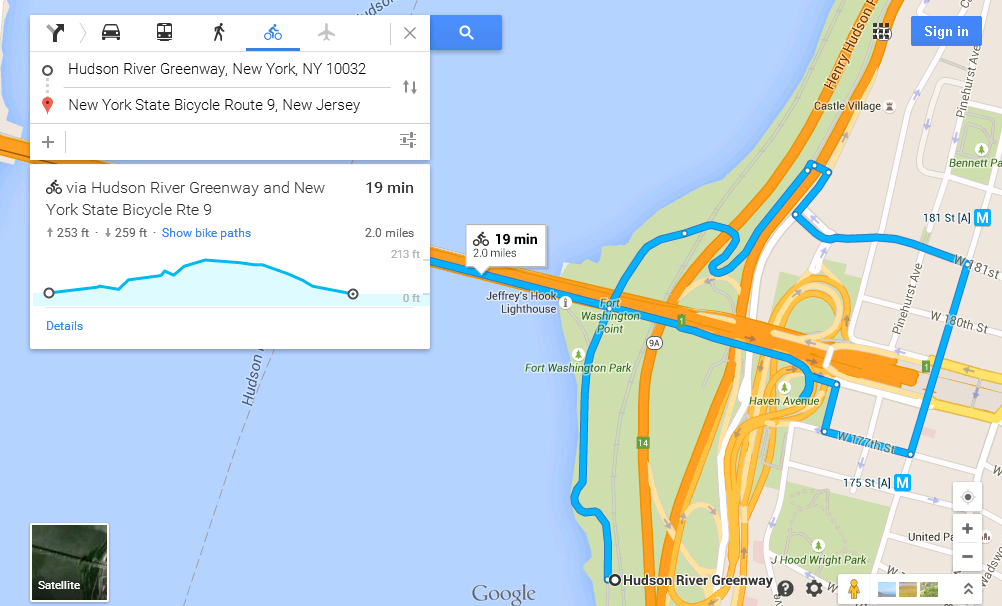
Getting out of NYC The only option for getting to this route is cycling up to George Washington Bridge and crossing. (Technically I guess you could get the NY Waterway boat across the river but you’d have to cycle on River Road northwards which isn’t very bike-friendly. I’ve been knocked off my bike there and I know of at least 3 other skilled riders being taken down on that road. Avoid!). So how do I get to the bridge? More specifically, how do I get to the South Walkway on the bridge? There is a north side walkway but it requires getting off your bike and carrying your bike up and down some stairs (not that many, but still). You can click the maps to go directly to Google Maps.
Ride North on the West Side Highway from anywhere in the city. Keep riding until you go under the bridge itself. This is mostly flat but when you get to the bridge you have to head up a steep incline which levels off after ~50m only to go even steeper again (20% incline +) for another 50m. If you hate hills or not comfortable riding in traffic, I would still recommend this way because you can walk up that hill pretty quickly. Once you get up the hill continue north and cross the bridge that goes over the highway. Turn right as you come off the bridge and then take the first left. You’ve then got to climb a little and then turn right at the second set of traffic lights onto Fort Washington Avenue. From there you should see signs on how to cross the bridge, but if you don’t see them, go south crossing the traffic lights where cars enter the bridge. Continue to 177th street and turn right, then right after two blocks. You’ll see the ramp for bikes.
The other option is to ride on Riverside Drive. This is the route I normally take because it’s closed to commercial traffic so isn’t highly trafficked and additionally you don’t have to navigate joggers and other bikes on the west side highway (WSH). The more ‘serious’ bikers tend to take this route. Get onto Riverside drive (see below for details) and head north. Keep going north. Turn right on 165th street and head up a short climb and turn left at the traffic lights. You’ll know you’re on the correct path if you pass the hospital on your left. Turn left on 177th street and take the second right where you’ll see the bike ramp.
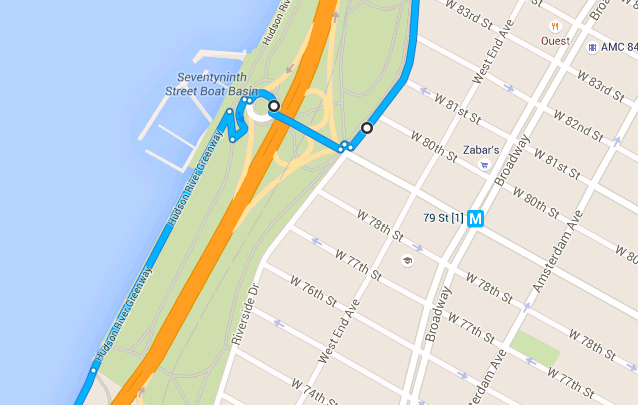
Getting onto Riverside drive from the Westside highway. My preferred method is to get on at 79th street. You cycle north on the westside highway. When you get into the 50s the path diverges from the main road, you cycle underneath the highway for a little bit. Once you’ve passed this section you’ll be cycling directly next to the river, this is where you need to be alert to exit. You’ll pass a few toilets and then you’ll get to the Boat Basin bar which will be on your right. Do a little U turn onto the path and cycle up, then take your first left which is again uphill. You’ll enter a traffic cycle/roundabout/roundpoint (whatever you want to call it), be careful here as there is traffic. Take the second exit (NOT THE FIRST as it’ll take you onto the highway). You’ll get to some traffic lights where you turn left onto Riverside Drive.
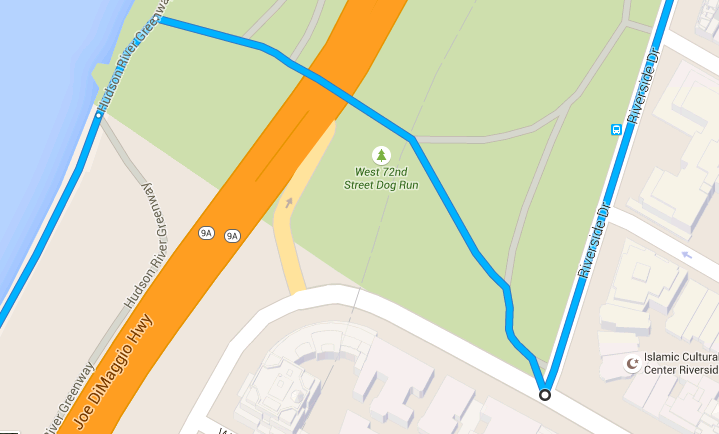
An alternative with less traffic but more pedestrians and dogs is to get onto Riverside Drive at 72nd. In this case, you cycle north on the WSH and when you leave the bike path with the highway above it, you take your first right up the path. You’ll be confronted with some stairs which you can walk up, or take the ramp just to the left of it. You’ll then go through the little tunnel and take the right fork with the dog park on the right. When you meet the road, take the left onto Riverside Drive. There are other options to get onto Riverside Drive from the highway but these two are pretty simple and generally doesn’t involve invoking the wrath of pedestrians.
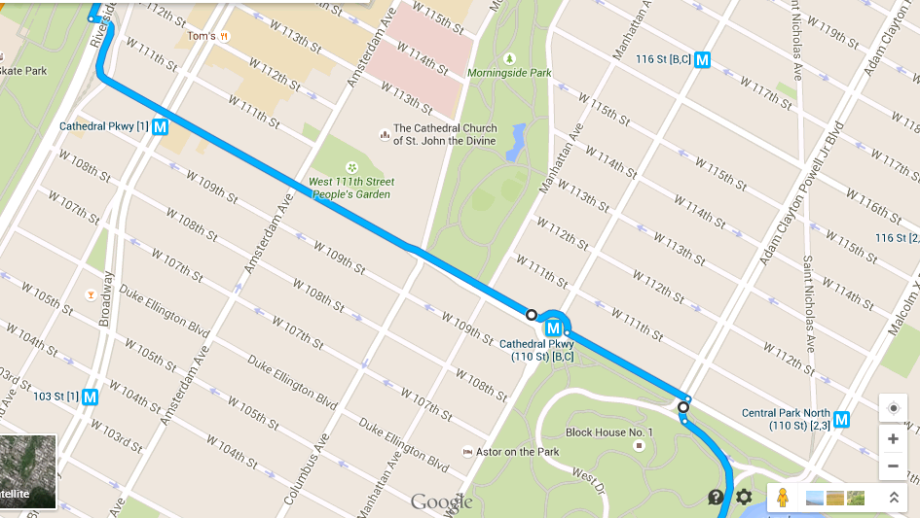
Let’s say you get to Central Park and there is a race on, it’s busy, or you just want to go further, You can exit the park pretty anywhere at or above 72nd street and just head west until you hit Riverside. The easiest way is just to exit the North side of the park and then head west on 110th street. If you’re really scared of traffic you can go west on 106th Street (it’s actually called Duke Ellington Boulevard) where there is a cycle path in both directions.
Wow, that was longer than expected. Now let’s assume you took one of those routes and got onto the bridge. Keep in mind these things:
Winds can get strong on the bridge where it’s very exposed. Be careful passing cyclists and pedestrians.
There are sometimes tourists hidden behind the support beams that like to step out and play Russian Roulette with cyclists (forgetting it it an active cycle path).
It’s two way traffic, stay to your right. If you pass, pass only on the left and announce yourself “On your left” in your most friendly polite tone possible!
There are a couple sections on the bridge where you take blind turns. Use the mirrors to see around the corner or just go slow.
If it’s icey out, the metal beams on some sections are extremely slippery! I went down once. Okay, maybe twice.
Hopefully you made it to New Jersey. Congratulations. Give yourself a little high five for not getting lost, hitting anyone, getting a ticket from policeman, etc. The west side of the bridge is the perfect place for meeting people as there is square concrete section where there is no traffic:
Now you can go via the parkway (hillier) or via the main road (less hilly).
During winter the park is closed. Often the gates will be closed but cyclists will go round the gates anyway. I’ve not heard of anyone being ticketed for this, so I guess the gates are closed for car traffic, and not cyclists. I’m not sure though, you can call the Park Commission if you want to check.
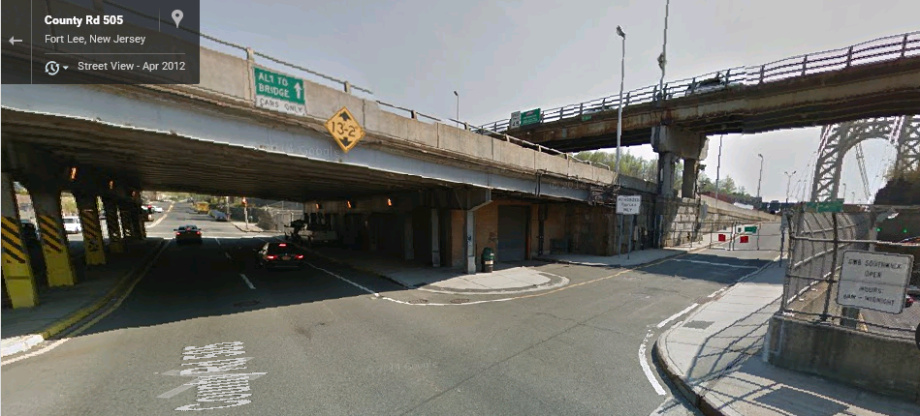
To get here take the left when you exit the bridge staying on the path (not the road). You’ll go down a 1/4 mile hill that can get pretty quick (stay to the right in case cyclists come up hill on the same path). Turn left into the park. Keep cycling north on the park until you pass the ranger station and then follow the road to the left where you’ll hit a T junction. The road that runs left to right is 9W. Left takes you back to the bridge. Right takes you on for miles more riding.
Alternatively you can stick to the road. In this case turn right out of the bridge and get onto the road. You’ll cycle past Strictly Bicycles (on the left) which is a great place to get food supplies, a cheeky coffee and maybe a new high-end bike if your wallet is feeling heavy. Stick with this road until you get to the end which is a T junction. Turn left, then take the right at the traffic lights. This is 9W. Happy riding.
Some notes on 9W
There isn’t much on the road so bring flat kit, water, etc. There are many cyclists which is good, but also bad because most cyclists will assume that someone else will stop for you. If you’re in trouble then call out to someone and they’ll be happy to help you… hopefully.
Recommended Food Stops: Filling station (my favourite – they have real food as well as baked goods), Bunbury for coffee and pastries in Piermont, and Runcibles in Nyack.
Most people don’t go out beyond Nyack so if you go further there are fewer cycle-heavy cafes.
You can go all the way to Bear Mountain (and beyond) with few traffic lights.
Keep a lookout for the green ‘Route 9’ bicycle route signs. There are turns along the way so if you don’t have a map, and refuse to keep an eye out for them, you will probably go the wrong way somewhere.
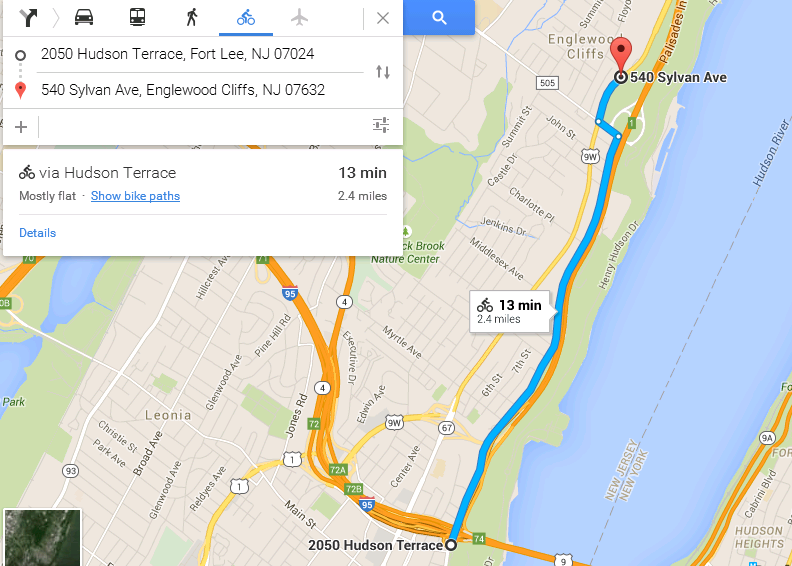
Here’s a site with some cue sheets from George Washington Bridge (GWB) to Nyack.
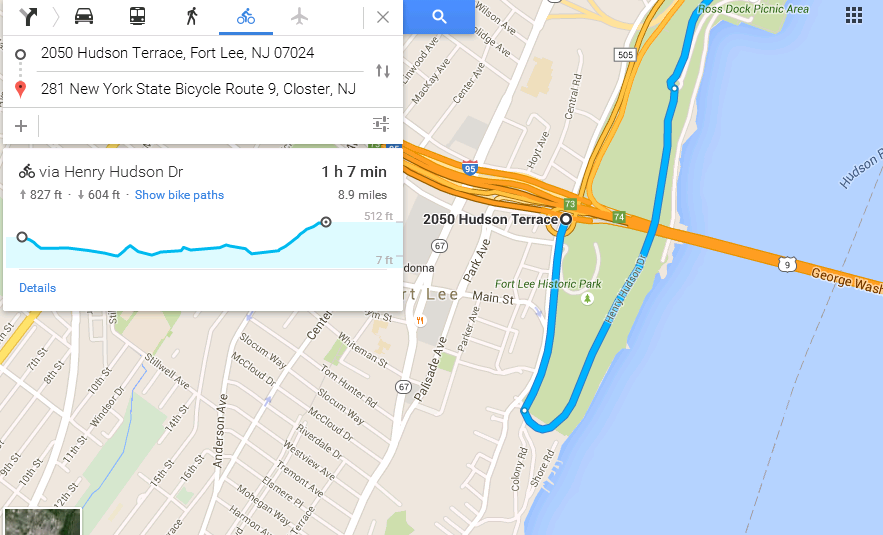
A mapmyride route from Central Park all the way to Bear Mountain and back (~100 miles). The outbound journey takes you to Bear Mountian via 9W, and the return is an alternative route back.
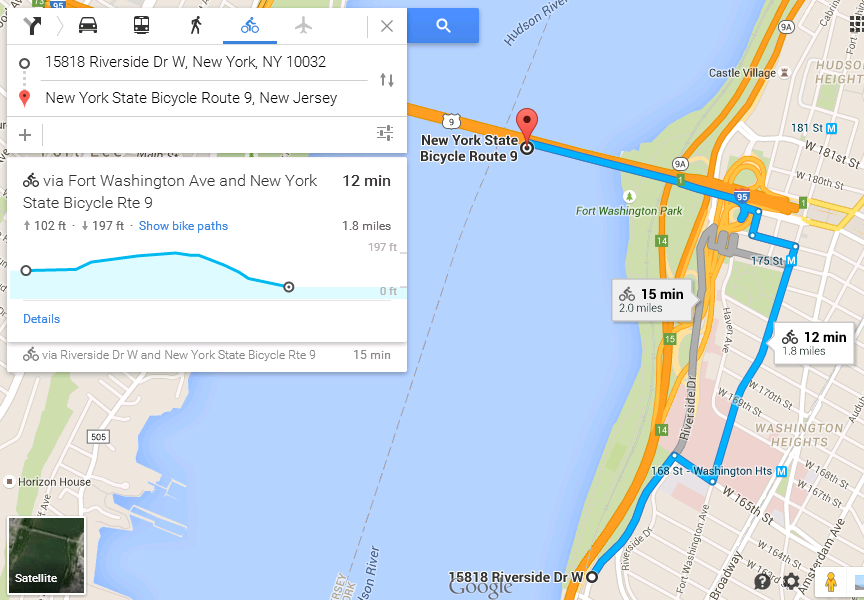
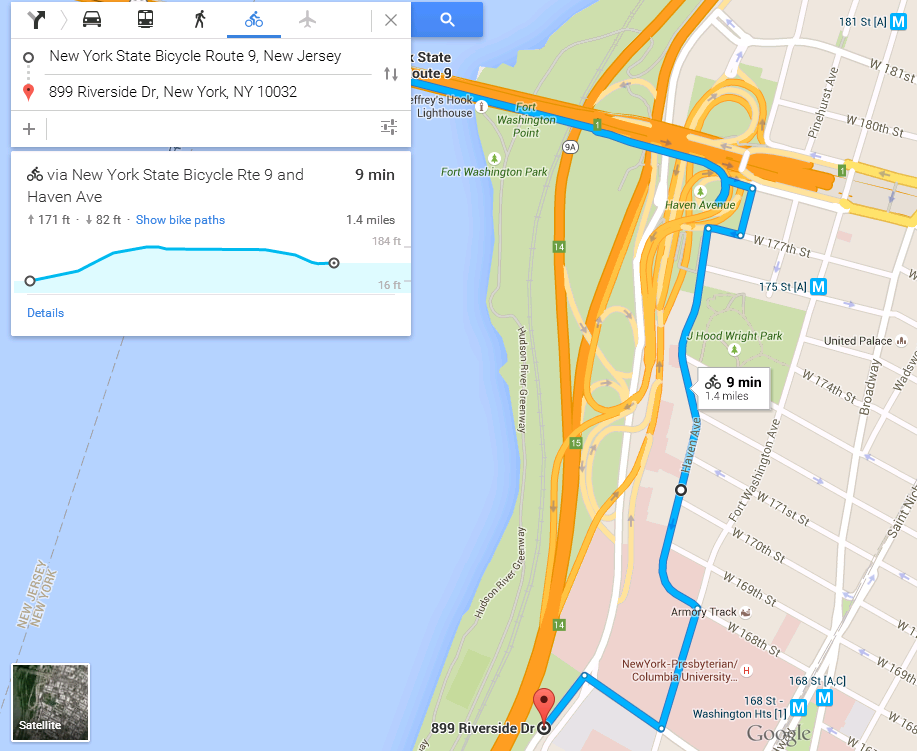
One last note. To get back onto Riverside drive from the GWB is slightly different:
Go back down the cycle ramp you went up. At the exit of the ramp turn right (going up the walkway/pavement). Turn right back onto the road (which has cycle lanes in both directions. Turn right to get back onto 177th street. Take the first left onto Haven Avenue (if you don’t turn left you’ll enter the highway!). At the end of Haven Avenue turn right onto Fort Washington Avenue. Then you’ll pass the hospital again and turn right onto 165th street and go down the hill. Turn left on Riverside drive to go downtown again.
The forward lean is a very difficult thing to convey simply by speech for someone to integrate into a dynamic movement because it requires a lot of pre-conditions to be fulfilled:
Neutral head position
Straight back/tight core (i.e. not slouching or arching)
If there are no issues with any of the above then you can ask someone to lean forward with a straight body and find that point just before they would fall over and ask them to maintain that lean throughout the running gait. A couple ways I like to demonstrate the forward lean:
Stand a couple inches back from a wall and lean forward until your head touches it. (Make sure you’re gentle and have no neck issues!). That helps illustrate the point but not integrate it into a dynamic movement.
Next is to do that same lean when you initiate the run and try and maintain the lean at all times. It takes practise and sometimes you need someone to film/photo you because you may feel you’re doing it but have just gone back to old habits. This video shows a drill that demonstrates it (the first half of the video)
Here’s another video that includes a section on the lean as well as posture and cadence: https://www.youtube.com/watch?v=JzeikFR8lJM. MF has been seeing some great gains and consistent PRs in recent races so it’s difficult to suggest changes to running style. Sometimes it’s good just to ride the wave, but on the next plateau in her performance, the forward lean would be the next point I would suggest to change. At first the forward lean will feel harder because it feels like it is forcing you to run faster. If you’re training by heart rate then this can be disconcerting as it just feels like your speed increase is directly related to working harder. This is where patience is required. On long runs it might be too much a push to maintain this style from day one. My suggestion would be to incorporate regular breaks into all runs so allow yourself to rest a moment and then restart the next run interval able to focus on technique. As with all technique changes you have to force the change in EVERY workout. For this reason it’s good to make these kind of changes as long as possible before an important race. After making the change I would hope to see her move from the red line (which is almost vertical) towards the green line. I say towards because if she moved all the way to the green line it would be an aggressive lean!
[Apologies for the low res image at the bottom. This was taken from a video I did on my phone. Apologies for the low res image at the bottom. This was taken from a video I did on my pho]
I was in the UK for a mates wedding one weekend and then a Baptism the following weekend in Ireland. The missus and I decided to get somewhere warm for the midweek to take a break from the east coast winter.
My mate Caesar told me he heads to Lanzarote a couple times a year to take advantage of their nicely paved hilly roads, sunshine, trails for running, and both lap pools and the open water for swimming. There are two main hotels that cater to the triathlon community in Lanzarote: Club La Santa and Sands Beach Resort. Caesar recommended Sands Beach because that’s his normal hangout.
So we opted for Sands Beach hotel. It worked out really well: here’s a pic from our balcony one evening as I was taking an evening dip. We got a great room and when we arrived there was a fruit basket and a bottle of wine for us to enjoy. The sad thing is we were there for 5 nights and we didn’t even manage to finish the wine!
One of the great things about Lanzarote is that it isn’t much more than 100k from one end to another so if you’re staying in Costa de Teguise (where both hotels are located) you can do out and backs and practically see the whole island in a few days.
You can ride to Costa de Famara and hang out on the beach. It’s incredibly cheap to rent a surf board or boogie board and wet suit and hit the waves. The waves are gentle and regular so great for a beginner surfer looking to get in some practise:
There are some flats on the LZ-1 route one you climb out of Costa de Teguisa (you can ride out to Orzola from there which is a pretty flat 80k there and back).
There’s a few places you can try your hand at camel riding:
Another one of the pool in the morning time. In the hotel you can rent a wetsuit for a couple days and try it out in the pool, or go down to the water to swim. You can swim out in front of HD Beach Resort or if you want to walk a bit further you can swim out of the Be Live Grand. Both areas are well protected, normally have some swimmers around and are at least a couple hundred yards from end to end. Costa de Teguise also has a small place to swim right there in the resort in front of some of the rooms. It’s a very shallow body of water and completely protected from the ocean, and is maybe 100 yards long.
The lady on her rented steed. You can rent bikes at Papagayo bikes which is also located at Sands Beach hotel. It really does have everything you could need.
Climbing out of Costa de Teguise:
Even when it’s cloudy it’s sunny:
In terms of running you can:
run west out of the resort for some less hilly road running;
run north for some very hilly road running (basically pure climbing until you chose to come back down running the fastest 10k of your life if you don’t trip over);
run east onto trails. There are a few trails, some which are undulating, but if you stick close to the water there are some very steep sections where you may have to walk up to avoid going over your max heart rate.
The food at Sands Beach resort is pretty good although I would highly recommend La Bohemia. We went there 3 times out of 5 and it was great every single time!